IPv6 6RD with Ubiquiti and DD-WRT
This posts walks through how to create an isolated network which has access to the IPv6 Internet via 6RD using Ubiquiti EdgeMax equipment and a router running DD-WRT. 6RD (Rapid Deployment) is a method to reach the IPv6 Internet by tunneling over an IPv4 network, similar to 6to4. While 6to4 is primarily used to connect different “IPv6 islands” together, 6RD was designed to allow a service provider connected to the IPv6 Internet in its core network to provide IPv6 services in the access layer based on its own registered IPv6 public address space without deploying native dual- stack (simultaneous IPv4 and IPv6 connectivity).
A service provider’s access layer (where end users connect to the network) frequently lags behind the rest of the network in technology due to the enormous cost of upgrading equipment that services the customers. Older equipment may not support IPv6, so tunneling IPv6 over IPv4 is a necessity. Over time, this will become a non-issue as access-layer technologies are upgraded. Chapter 7 of “IPv6 Essentials, 3rd Edition” by Silvia Hagen goes into excellent detail on the background and operation of 6RD.
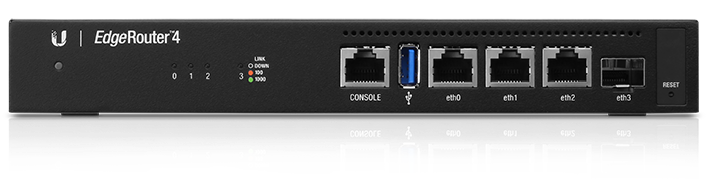
My setup is with a Ubiquiti EdgeMax-series EdgeRouter 4, EdgeSwitch 8-150w, and a NetGear R7000 running DD-WRT as a wireless access point (WAP).
Why not a Ubiquiti WAP also? I am a big fan of Ubiquiti gear, and have several WAPs deployed in my company (and they work really well). I used to have a full Meraki stack (router, switch, AP), and was pretty happy with that. But, when the license expired, it was a pretty difficult pill to swallow to relicense when I could spend just a little bit more money and acquire better hardware with more features, and most important: no licensing to deal with. When I bought the router and switch, I was considering buying a Ubiquiti AP also, but I have a not-too-old NetGear R7000 router that I converted into an access point. The R7000 has 802.11ac Wave 1 triple-chain hardware, and by installing DD-WRT, I am able to create multiple wireless networks in segmented VLANs. Perfect for this project!
My initial plan was to merely set up 6RD so every connected device would have IPv6 Internet access. Even though 6RD is based on your service provider’s own public IPv6 address space, many ISPs (particularly in the United States) are very large and cover vast geographic areas, such as is the case with my current ISP (CenturyLink). NetFlix does not appreciate this (geo-blocking). It then occurred to me that in reality, I am the only one who cares about IPv6 Internet access right now, so why don’t I create my own isolated IPv6-capable network?
Part of 6RD configuration is determining what your IPv6 prefixes will be. You will need this in order to assign static IPv6 addresses in various parts of the configuration. Your 6RD prefixes are based on your provider’s 6RD prefix and your public IPv4 address. CenturyLink uses 2602::/24 for its base prefix, with the following 32 bits consisting of your public IPv4 address converted to hexadecimal. Each IPv4 octet becomes two hexadecimal digits. For example, I’ll choose a random CenturyLink IPv4 address 71.222.12.34 which becomes 47.de.0c.22. You can do the conversion in your head**, with a programmer’s calculator, or with this handy shell script (which can also be issued within the Ubiquiti CLI):
IP='71.222.12.34'
printf "2602:%02x:%02x%02x:%02x00::/56\n" $(echo $IP | tr . ' ')
2602:47:de0c:2200::/56 is the result in this case. There are a few points to note. Since the 6RD prefix is 24 bits and the hex-converted IPv4 address portion is 32 bits, the address could be written like this: 2602:0047:de0c:2200::/56. Because we are working with a /56, this means you can create 256 /64 prefixes, 00 through FF.
The first major configuration step is to prepare the Ubiquiti EdgeMax router. I am using eth0 as the DHCP-enabled WAN-facing interface which holds my public IPv4 address. My LAN-facing interface is eth1, which connects to port 1 on my EdgeSwitch. Since my goal is to create an isolated network, I created a new VLAN from the EdgeRouter GUI Dashboard page by clicking “Add Interface > Add VLAN”. I created VLAN 6, associated it with the LAN-facing eth1 interface, and assigned two addresses, 2602:47:de0c:2206::1/64 (subnet 06) and 10.6.6.1/24. If you desire IPv6-only connectivity, do not configure an IPv4 address.

My 6RD configuration was modified from this information by Chris Cowart. While I am on a CenturyLink gigabit fiber connection like Chris, I am using different interfaces and not using PPPoE. The Ubiquiti EdgeMax series currently offers limited configuration capabilities in the GUI, so the CLI is required.
First, a generic IPv6 firewall is put in place which accepts only ICMPv6 traffic and previously-established connections inbound. The CenturyLink 6RD border router IPv4 address is defined, and IP protocol 41 (IPv6 tunneled over IPv4) is allowed. Then, a tunnel interface is configured. EdgeOS (and many others) define this as a Simple Internet Transition (SIT) tunnel type. The tunnel has its MTU adjusted to account for the 20-byte overhead of IPv6 in IPv4 tunneling. IPv6 default routing is configured, and the eth1 VLAN 6 interface is set up to start sending IPv6 RA’s. The “blackhole” route is similar to a static route to Null0 in the Cisco world.
# Full credit to Chris Cowart for the original configuration!
# https://github.com/cpcowart/ubiquiti-scripts/blob/master/centurylink-6rd.md

# Generic IPv6 firewall allowing ICMPv6 and previously-established
# connections inbound, and blocking everything else.
set firewall ipv6-name internet6-in enable-default-log
set firewall ipv6-name internet6-in rule 10 action accept
set firewall ipv6-name internet6-in rule 10 description 'Allow established connections'
set firewall ipv6-name internet6-in rule 10 log disable
set firewall ipv6-name internet6-in rule 10 state established enable
set firewall ipv6-name internet6-in rule 10 state related enable
set firewall ipv6-name internet6-in rule 20 action drop
set firewall ipv6-name internet6-in rule 20 log enable
set firewall ipv6-name internet6-in rule 20 state invalid enable
set firewall ipv6-name internet6-in rule 30 action accept
set firewall ipv6-name internet6-in rule 30 log disable
set firewall ipv6-name internet6-in rule 30 protocol icmpv6

# IPv6 firewall rule to allow IPv6 over IPv4 traffic from CenturyLink's
# 6RD border router.
set firewall name internet-in rule 100 source address 205.171.2.64
set firewall name internet-in rule 100 protocol 41
set firewall name internet-in rule 100 action accept

# Create 6RD tunnel interface toward CL's 6RD BR and associate the interface
# with the IPv6 firewall. MTU set to 1480 to account for 20-byte
# tunnel overhead (subtract 8 when using PPPoE). Using local-ip 0.0.0.0
# enables access to the tunnel from any IPv6-enabled interface.
set interfaces tunnel tun0 description 'CenturyLink 6RD Tunnel'
set interfaces tunnel tun0 encapsulation sit
set interfaces tunnel tun0 firewall in ipv6-name internet6-in
set interfaces tunnel tun0 firewall local ipv6-name internet6-in
set interfaces tunnel tun0 local-ip 0.0.0.0
set interfaces tunnel tun0 mtu 1480
set interfaces tunnel tun0 multicast enable
set interfaces tunnel tun0 remote-ip 205.171.2.64
set interfaces tunnel tun0 ttl 255

# The tunnel IPv6 address only needs to be a /128, and can be anything
# within the entire 2602:47:de0c:2200::/56 (except the other router addresses)
set interfaces tunnel tun0 address 2602:47:de0c:2200::/128

# Discard local unknown IPv6 addresses, and send all other unknowns
# out the tunnel toward the 6RD border router.
set protocols static route6 2602:47:de0c:2200::/56 blackhole
set protocols static interface-route6 ::/0 next-hop-interface tun0

# Enable IPv6 RA's on the eth1 VLAN 6 interface.
set interfaces ethernet eth1 vif 6 ipv6 dup-addr-detect-transmits 1
set interfaces ethernet eth1 vif 6 ipv6 router-advert cur-hop-limit 64
set interfaces ethernet eth1 vif 6 ipv6 router-advert managed-flag false
set interfaces ethernet eth1 vif 6 ipv6 router-advert max-interval 30
set interfaces ethernet eth1 vif 6 ipv6 router-advert other-config-flag false
set interfaces ethernet eth1 vif 6 ipv6 router-advert prefix '::/64' autonomous-flag true
set interfaces ethernet eth1 vif 6 ipv6 router-advert prefix '::/64' on-link-flag true
set interfaces ethernet eth1 vif 6 ipv6 router-advert prefix '::/64' valid-lifetime 600
set interfaces ethernet eth1 vif 6 ipv6 router-advert reachable-time 0
set interfaces ethernet eth1 vif 6 ipv6 router-advert retrans-timer 0
set interfaces ethernet eth1 vif 6 ipv6 router-advert send-advert true
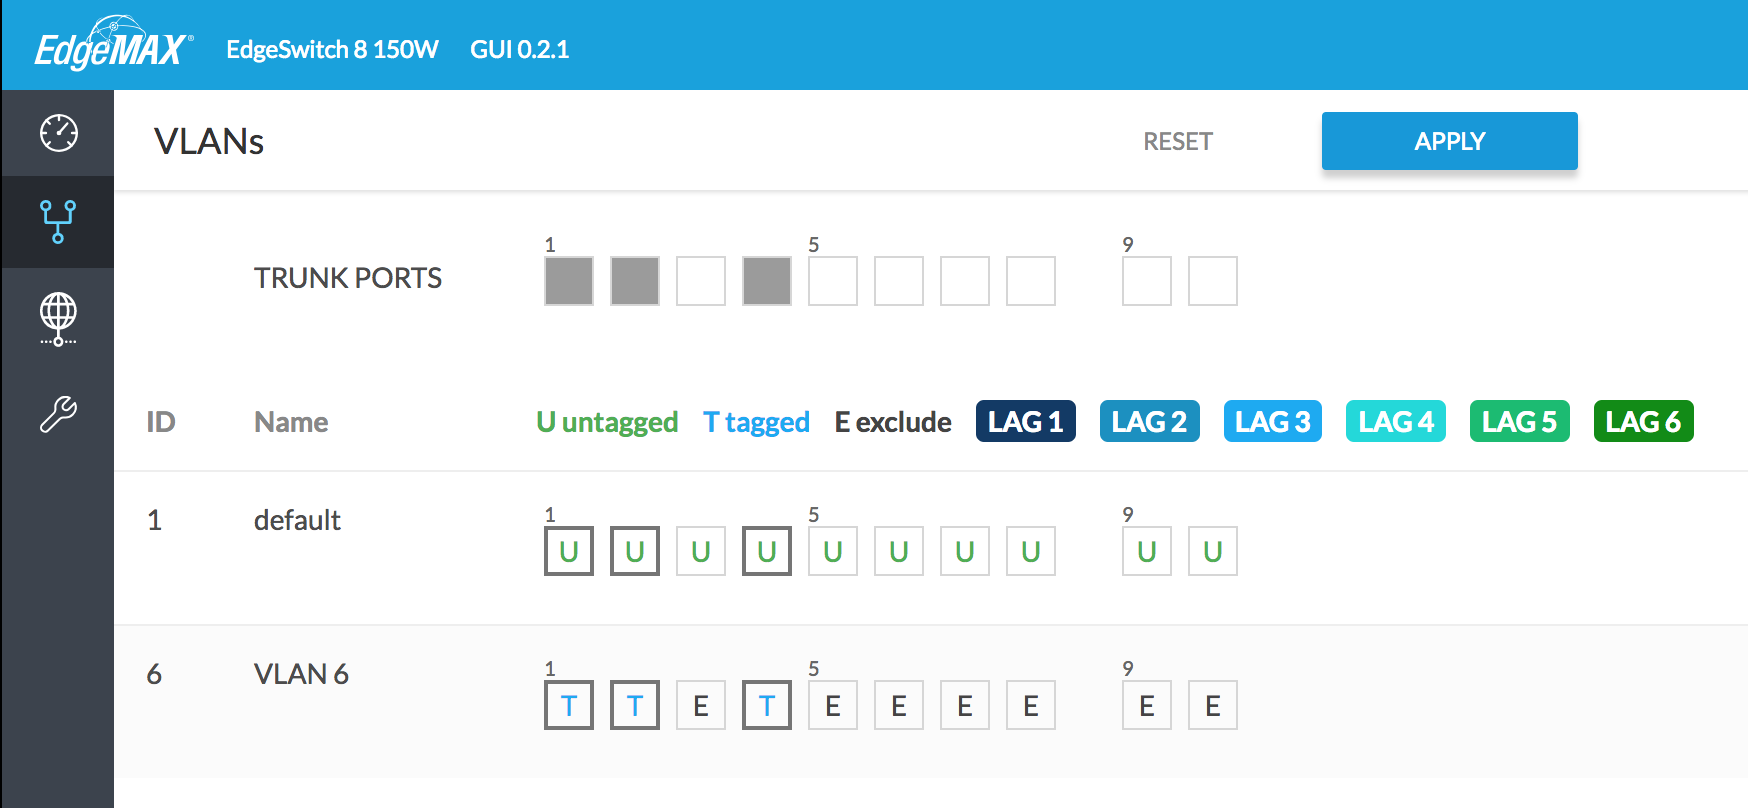
The second major configuration step is to create a new VLAN on the EdgeSwitch, and enable tagging on the appropriate ports. This can all be done within the GUI. Click the VLANs tab, enter a number in the “New VLAN ID” box (6 in this case), and click the plus sign. Designate the appropriate ports as trunks, and enable tagging for VLAN 6. In my case, port 1 goes to the EdgeRouter, port 2 goes to my R7000 WAP, and port 4 goes to my ESXi server. On the ESXi server, by creating a new port group and associating it with VLAN 6, virtual machines will have access to the IPv6 Internet as well. Click the “Apply” button when finished.
The third and final major configuration step is to prepare the R7000 router. I started from the stock NetGear firmware, and updated it to the latest R7000 DD- WRT firmware via chk file. This entire section took the longest as I ran into several issues that I will detail here (and hopefully save you some time!). Upgrading from the stock firmware reset all settings. To begin the DD-WRT configuration process, I logged in to the SSID “dd-wrt” using the password printed on the bottom of the router. The router has only a baseline configuration and is acting as a DHCP server with the IP address 192.168.1.1 at this point. Open this address in a web browser to continue with the configuration.
The first thing I did was configure DD-WRT to participate as a regular WAP (and not a router), like it was doing previously with the stock firmware. Under “Setup > Basic Setup”, I set the “WAN Connection Type” to “disabled”. I configured a static IP on my primary VLAN, and added the IPv4 address of the EdgeRouter as the default gateway and DNS server. I disabled the DHCP server, and defined an NTP server. After making the changes, click “Save”, then “Apply Changes”. Reconnect to the R7000 using the static IP address to continue. I then went to “Administration > Management” and set the admin username and password. Finally, I went to “Wireless > Basic Settings” and “Wireless > Wireless Security” to reconfigure my previous 2.4 GHz and 5 GHz WLANs. Now that the preliminary DD-WRT configuration is out of the way, we can continue to add the new isolated WLAN.
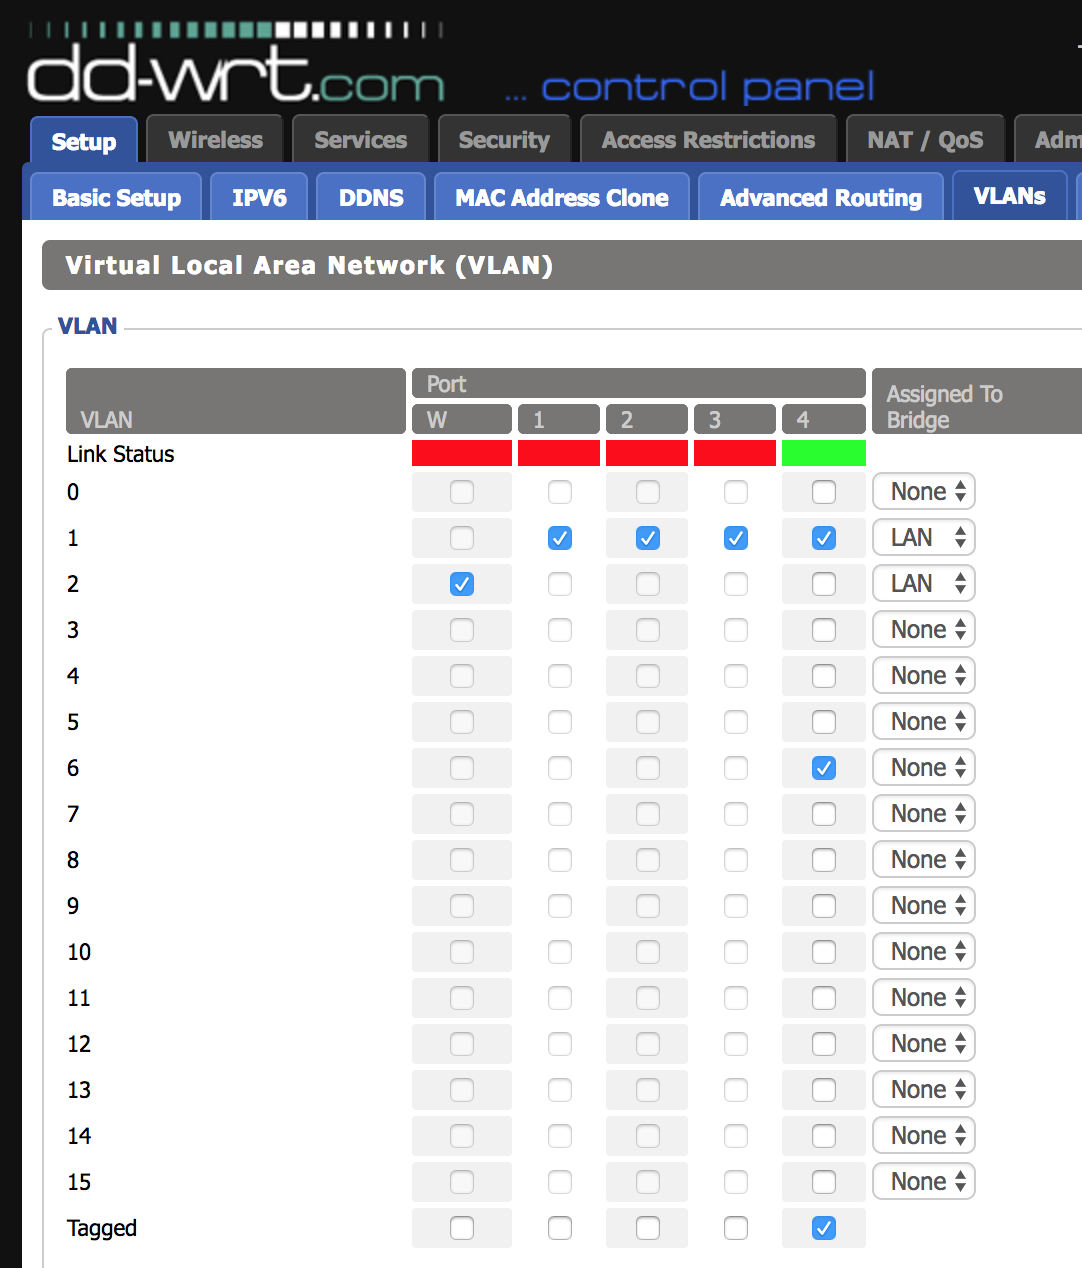
Go to “Setup > VLANs”. Underneath the port connected to the EdgeSwitch (R7000 port 4 in my case), click the “Tagged” check box, then check a box for a VLAN, 3 - 15. Don’t think of these as VLAN numbers, but as VLAN “slots”, meaning DD- WRT on the R7000 supports up to 16 VLAN definitions. I chose 6 just for consistency. This will cause the link to be tagged with VLAN 6 automatically, but this setting can be overridden later if you are using a different VLAN number. Do not change the bridge assignment. Save the settings, then apply.
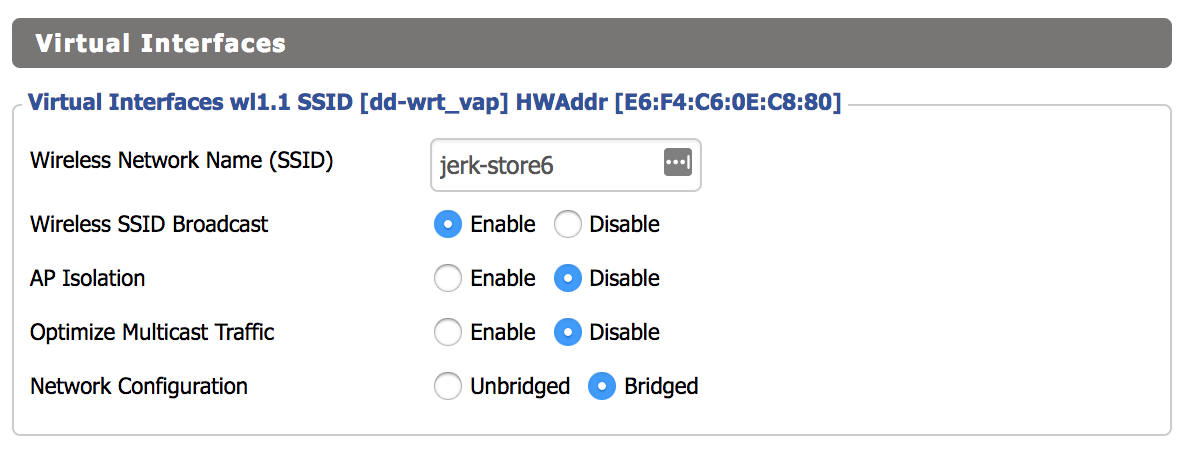
Next we’ll set up the new SSID. Go to “Wireless > Basic Settings”, and click the “Add” button under the “Virtual Interface” category. Remember that SSIDs are defined per-radio. In my case, I created the new SSID only on the 5 GHz radio. Name your SSID, leave the “Network Configuration” setting to “Bridged”, then save and apply.
The next step is to create a bridge interface. Click “Setup > Networking”, then click the “Add” button under “Create Bridge”. The name can be anything you like, I used “br6” for consistency. There is no need to enable STP since the R7000 is acting as a WAP. Click save and apply.

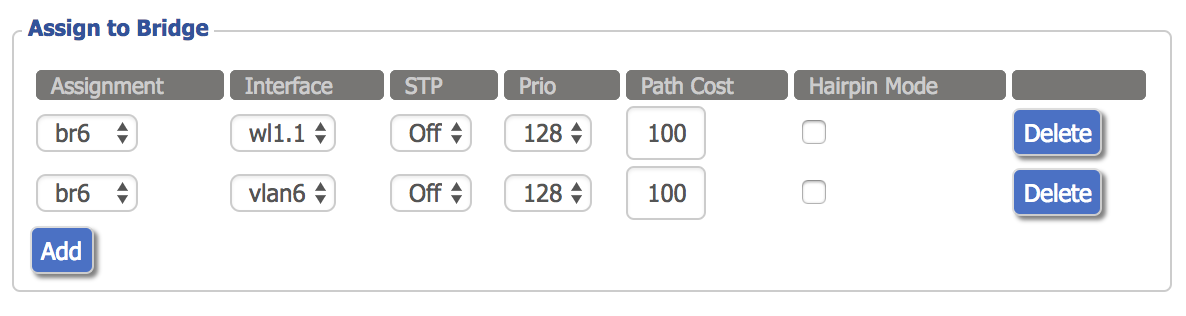
Now, click the “Add” button twice under the “Assign to Bridge” section. Under the “Assignment” column, select the new bridge for both rows. Under the “Interface” column, select the WLAN interface corresponding to the new SSID you added (wl1.1 in this case) for one row, and the VLAN slot for the other row (vlan6 in this case).
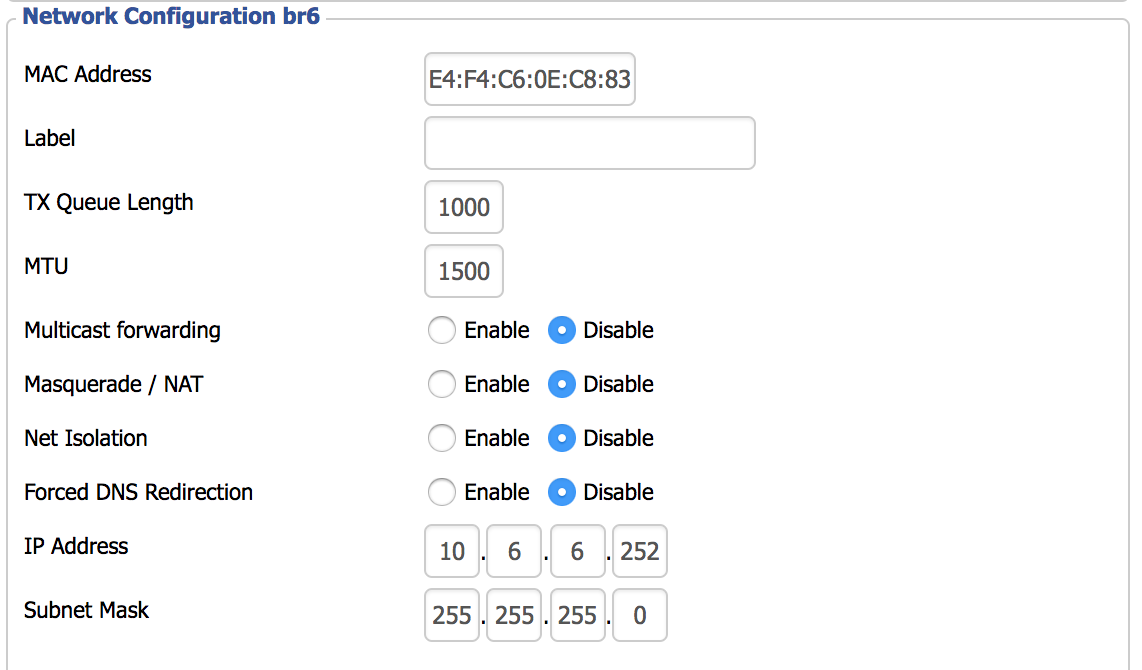
We can also configure the IPv4 Layer 3 interface under the “Network Configuration br6” section. Disable “Masquerade / NAT” and assign an appropriate IPv4 address. Click save and apply.
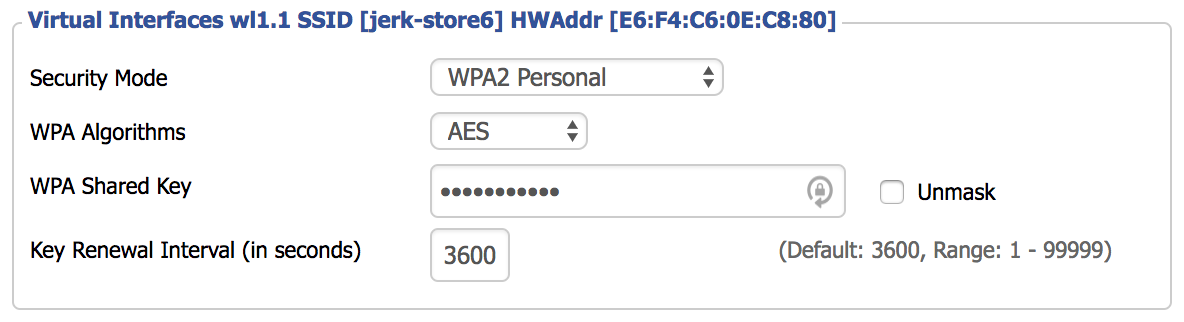
Now we’ll enable protected access: go to “Wireless > Wireless Security”, and configure the appropriate settings for the new SSID. Most people will use “WPA2 Personal” unless you have a AAA setup with RADIUS (DD-WRT has a built-in FreeRadius server if you are so inclined).
Click “Save”, but do not click “Apply” yet. I ran into a problem that took awhile to chase down. I don’t know if the issue is with DD-WRT in general, or just the R7000. I had to go to the “Services” tab and disable “DNSMasq”. Until I disabled this setting, I could not connect to the new SSID after configuring authentication.

Click save and apply. Go to the “Administration” tab, scroll down to the bottom, and reboot the R7000. When it comes back up, you should now have authenticated access to the SSID providing segregated access to the IPv6 Internet, with your IPv6 address configured via SLAAC:

The downside to this is that since my public IPv4 address is obtained via DHCP, I will have to reconfigure the EdgeRouter if my IPv4 address ever changes. Luckily this is extremely rare, and is something that could be scripted.
There is one more very important factor to keep in mind: unlike with IPv4, you are no longer behind a NAT, so you cannot use “security through obscurity” as a defense mechanism anymore. Every device on this VLAN is now directly connected to the public IPv6 Internet with its own individual public IPv6 address, so make sure you run a personal firewall on all of your IPv6 devices attached to this network! The firewall settings on the EdgeRouter will protect against unsolicited attacks, but once you make a connection with a malicious IPv6 host, your device may be up for grabs until the session times out.
The concepts in this guide can also be used to create a guest WLAN. With everything now configured, I can say that DD-WRT is very finicky. Many settings require a full router reboot before they actually take effect. While you’re getting some enterprise-level features for a much cheaper price, the software stability leaves a little to be desired. Conversely, my experience has been that Ubiquiti WAPs are really excellent. My next home network upgrade will definitely be to replace the R7000 with a real WAP. But, sometimes its fun to see what you can do with what you already have, and sometimes you have no choice, such is the life of a typical enterprise network engineer.
** Yes, you can convert from decimal to hexadecimal in your head. When dealing with IPv4 addresses, the conversion is somewhat easier because you are only dealing with a range of values from 0 to 255. Since each IPv4 octet represents two hexadecimal digits, the range in hex is 00 to FF. The left hexadecimal digit counts the number of “16s”. 32 in decimal is 20 in hex. 33 in decimal is 21 in hex, and so on. So for any given number, the left hex digit is how many times the decimal number can be divided by 16, and the right hex digit is the remainder. 222 has thirteen 16s in it, with 14 left over, making decimal 222 be DE in hex (D=13, E=14).